
There’s something incredibly satisfying about baking your own bread from scratch. The smell that fills your kitchen, the golden crust fresh from the oven, and the soft, fluffy slices that are perfect for sandwiches—homemade bread simply beats store-bought every time.

This Homemade Sandwich Bread recipe creates a loaf that is soft, tender, and easy to slice. It’s the kind of bread that works for almost anything: peanut butter and jelly sandwiches, grilled cheese, French toast, toast with butter and jam, or even homemade croutons.
If you’ve never baked bread before, don’t worry. This recipe walks you through the entire process step by step—from activating the yeast to shaping the loaf and baking it to perfection. Once you try making your own sandwich bread, you might find yourself baking a loaf every week.
Why You’ll Love This Recipe
There are plenty of reasons to start making your own sandwich bread at home.
Soft and fluffy texture
This loaf bakes up light and airy with a tender crumb, making it perfect for sandwiches and toast.
Simple ingredients
You only need a handful of pantry staples—nothing artificial or complicated.
Perfect for beginners
Even if you’ve never baked bread before, the detailed instructions make the process easy to follow.
Ingredients for Homemade Sandwich Bread

Here’s everything you’ll need to make this soft and fluffy sandwich bread.
Water
Warm water helps activate the yeast and start the fermentation process.
Whole Milk
Whole milk adds richness and softness to the bread thanks to its fat content. Using lower-fat milk can make the loaf slightly drier.
Granulated Sugar
Sugar feeds the yeast during the blooming stage and helps the bread rise properly.
Active Dry Yeast
Active dry yeast is ideal for this recipe because it ferments a bit slower, which results in better flavor and texture.
Unsalted Butter
Butter adds richness and softness to the bread. Using unsalted butter helps you control the overall salt level.
Bread Flour
Bread flour has a higher protein content than all-purpose flour, which helps develop gluten and gives the loaf structure while keeping it fluffy.
Salt
Salt enhances flavor and strengthens the dough structure.
Active Dry Yeast vs Instant Yeast
Many bakers wonder if instant yeast can replace active dry yeast. While both will work, active dry yeast is often preferred for sandwich bread.
Active dry yeast requires a short blooming process before mixing into the dough. During this time the yeast activates and begins fermenting the sugar, producing carbon dioxide bubbles that help the dough rise.
This slightly slower fermentation creates a loaf with better flavor and a lighter texture.
Instant yeast can still be used if that’s what you have, but the blooming step may be skipped and the yeast can be mixed directly with the dry ingredients.
How to Bloom Yeast Properly
Blooming yeast is a simple step that ensures your bread rises correctly.
Start by gently warming the water and milk together until they reach 100–110°F (38–43°C). This temperature range activates the yeast without killing it.
Pour the warm liquid into a measuring cup or bowl and stir in the sugar until dissolved. Sprinkle the yeast over the surface and stir lightly.
Let the mixture sit for about 10 minutes.

If the yeast is active, it will form a thick foamy layer on top and produce a slightly yeasty smell. This indicates the yeast is alive and ready to use.
If no foam forms, the yeast may be expired or the liquid may have been too hot. In that case, discard the mixture and start again.
How to Make Homemade Sandwich Bread
This bread is made in three main stages: mixing the dough, allowing it to rise, shaping the loaf, and baking it.
Step 1: Mix the Dough
In the bowl of a stand mixer fitted with a dough hook, add the bread flour and salt. Give them a quick stir to combine evenly.
Slowly pour in the bloomed yeast mixture, allowing the flour to gradually absorb the liquid. Then add the melted butter.
Turn the mixer on low speed and knead the dough for 5 to 7 minutes. During this time the dough should begin to come together into a soft, elastic ball.
The dough should feel smooth and slightly tacky but not overly sticky.
Step 2: First Rise
Lightly oil a large bowl and place the dough inside, turning it once so the surface is coated.
Cover the bowl with a clean kitchen towel or plastic wrap and let it rise in a warm place.
Allow the dough to rise for about 1 hour or until it doubles in size. This step allows gluten to develop and gives the bread its light structure.
Step 3: Punch Down and Shape the Dough
Once the dough has doubled, gently press it down to release the built-up air.
Transfer it to a lightly floured surface and knead briefly for 1–2 minutes to smooth it out.
Let the dough rest for about 5 minutes so the gluten relaxes. This makes it easier to shape.
Using your hands, flatten the dough into a rectangle roughly the width of your loaf pan.
Starting from the short edge, roll the dough tightly into a log, pressing gently with each roll to remove large air bubbles.
Pinch the seam along the bottom to seal it and tuck the ends underneath the loaf.
Step 4: Second Rise
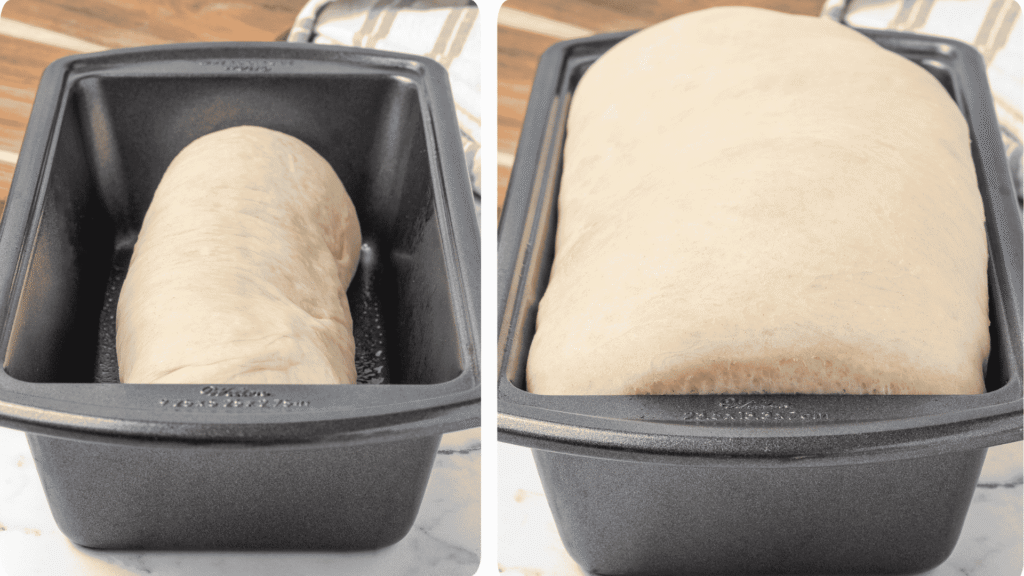
Lightly grease a 9×5-inch loaf pan.
Place the shaped dough into the pan seam side down. Cover loosely with a towel and allow it to rise again.
The dough should rise until it doubles in size and reaches just above the top of the pan, which usually takes about 30–45 minutes.
Step 5: Bake the Bread
Preheat your oven to 350°F (175°C).
Place the loaf in the center of the oven and bake for 25–30 minutes, or until the top is golden brown and the loaf sounds hollow when tapped.
Immediately brush the top with a little melted butter for extra flavor and a soft crust.
Allow the bread to rest in the pan for about 15 minutes, then gently remove it and place it on a wire rack to cool completely.
Letting the bread cool fully helps it set properly and makes slicing easier.

How to Shape the Perfect Sandwich Loaf
Shaping bread properly ensures an even texture and prevents large air pockets.
Start by flattening the dough into a rectangle that matches the width of your loaf pan. Press out any visible air bubbles with your fingers.
Roll the dough tightly from the short end, gently pulling it toward you as you roll. This creates tension in the dough, which helps the loaf rise upward rather than spreading outward.
Once rolled, pinch the seam closed and tuck the ends under. Place the dough into the pan seam-side down so the loaf keeps its shape while rising.
Rising Bread in a Cold Kitchen
If your kitchen is chilly, bread dough may take longer to rise. Fortunately, there’s an easy trick.
Preheat your oven to its lowest temperature (around 170°F / 75°C), then turn it off.
Place the covered dough inside the warm oven and let it rise there. The gentle warmth creates an ideal environment for yeast to thrive and usually speeds up the rising time.
Helpful Tips for Success
Measure Flour Correctly
Use the spoon-and-level method. Spoon flour into your measuring cup and level it off with a knife instead of scooping directly from the bag.
Knead Properly
If you don’t have a stand mixer, you can knead the dough by hand. It will take about 10 minutes of kneading to reach the same smooth texture.
Don’t Stress About Perfection
Homemade bread sometimes comes out slightly different each time. A loaf might rise unevenly or develop a few larger air pockets—but it will still taste amazing.
Storing and Freezing Homemade Bread
Because homemade bread contains no preservatives, proper storage helps keep it fresh.
Wrap the cooled loaf tightly in foil or plastic wrap and store it in an airtight container.
Room temperature: up to 4 days
Refrigerator: about 7 days
Freezer: up to 3 months
If freezing, slice the loaf first and place small pieces of parchment paper between the slices. This makes it easy to remove only what you need without thawing the entire loaf.
Ways to Use Homemade Sandwich Bread
This bread works for so many recipes.
Some favorites include:
-
Classic peanut butter and jelly sandwiches
-
Grilled cheese
-
French toast
-
Breakfast toast with butter and jam
-
Homemade croutons
-
Bread pudding
Final Thoughts
Baking your own Homemade Sandwich Bread may take a little time, but the results are absolutely worth it. The flavor, texture, and aroma of freshly baked bread are hard to beat.
Once you get comfortable with the process—from blooming yeast to shaping the loaf—you’ll find that making bread at home becomes surprisingly easy.
And after your first slice of warm, buttery bread straight from the oven, you may never want to go back to store-bought again.
Soft Homemade Sandwich Bread
Ingredients
Equipment
Method
- Add 2½ cups of bread flour and salt to the bowl of a stand mixer. Whisk briefly to combine, then set aside.
- In a small saucepan, gently heat the water, milk, and sugar until the mixture reaches 100–110°F (38–43°C). Pour the warm liquid into a measuring cup and verify the temperature if possible.
- Stir the active dry yeast into the warm liquid mixture. Let it sit for about 10 minutes until it becomes foamy and fragrant.
- 💡 Tip: If the mixture doesn’t foam, the yeast may be expired or the liquid may have been too hot. Discard and start again.
- Attach the dough hook to your stand mixer and start it on low speed. Slowly pour the yeast mixture and melted butter into the flour mixture.
- Allow the mixer to knead the dough for about 7 minutes until smooth and elastic.
- 👉 If the dough still sticks heavily to the bottom of the bowl after about 5 minutes, add 1 tablespoon of flour at a time until it becomes soft and slightly tacky but not sticky.
- Transfer the dough to a lightly oiled bowl, cover, and place it in a warm spot to rise until doubled in size. This usually takes 45 minutes to 1½ hours.
- 💡 Cold kitchen trick:
- Warm your oven briefly to about 170°F, turn it off, and place the bowl inside to create a cozy proofing environment.
- Once the dough has doubled, gently punch it down to release the air. Transfer it to a clean surface and knead lightly for 1–2 minutes. Let it rest under a towel for 5 minutes.
- Flatten the dough into a rectangle roughly the width of your loaf pan. Roll it tightly from the short edge to form a log, pressing gently with each roll to remove air pockets. Pinch the seam closed and tuck the ends underneath.
- Place the shaped dough seam-side down in a lightly greased 9×5 loaf pan. Cover and allow it to rise again until doubled in size, about 30–60 minutes.
- Preheat your oven to 375°F (190°C) with the rack in the center.
- Bake the bread for 25–30 minutes, or until the top is golden brown and the loaf sounds hollow when tapped.
- Remove the bread from the pan immediately and place it on a wire rack to cool completely. Once cooled, slice using a sharp bread knife.
Notes
Use the spoon and level method: fluff the flour, spoon it into the measuring cup, then level it off with a knife. ✔ No stand mixer?
You can knead the dough by hand—just expect to knead for 10–14 minutes until smooth and elastic. ✔ Bread doesn’t have to be perfect
Homemade bread often has a rustic look. Sometimes loaves rise unevenly or develop air pockets—but they’re still delicious. The beauty of homemade bread is in its charm!