Golden, crispy, juicy—this fried chicken breast recipe is everything you’ve been craving. Imagine perfectly pan-fried chicken cutlets with a crunchy Parmesan crust and a tender, flavorful inside, all without deep frying.
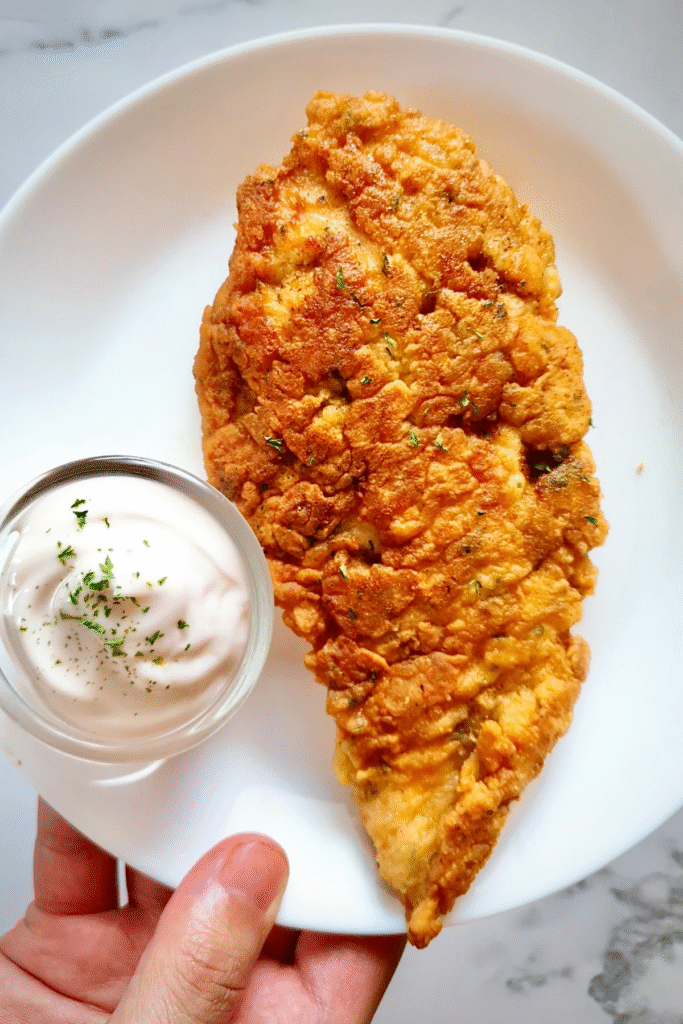
This recipe gives you that irresistible crispiness you love in fried chicken, but with a quicker cook time, less oil, and loads of flavor.
Serve these pan-fried chicken breasts with a simple salad, pasta, mashed potatoes, or even tuck them into a sandwich. However you plate them, they’re guaranteed to be a hit at the table!
Why You’ll Love This Recipe
- Perfectly crispy without deep frying – pan-fried in a little oil and butter for maximum crunch and flavor.
- Juicy and tender – no more dry chicken breasts! These cutlets stay moist inside.
- Simple pantry ingredients – flour, eggs, Parmesan, garlic, and parsley make magic here.
- Versatile serving options – pair with pasta, veggies, biscuits, or make a crispy chicken sandwich.
- Quick and easy – ready in about 20 minutes from prep to plate.
Ingredients & Substitutions
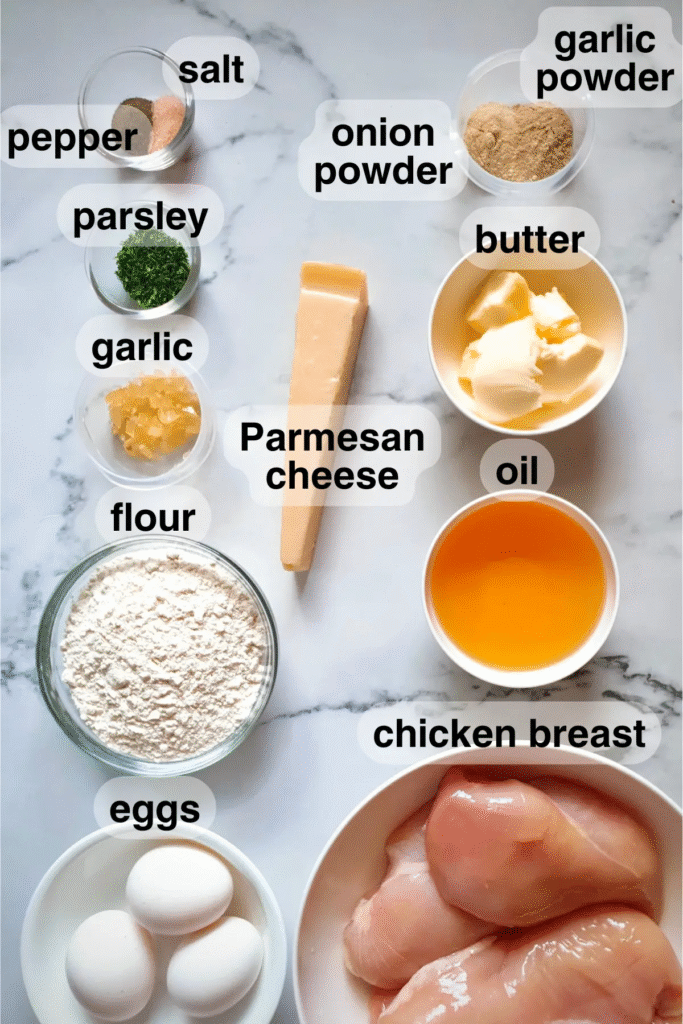
Here’s what you’ll need:
- Chicken breasts – boneless and skinless, sliced into cutlets and lightly pounded for even cooking. (Chicken tenders or thighs also work—adjust cooking time for dark meat.)
- Garlic cloves – fresh and minced for flavor (garlic powder works too).
- Salt & black pepper – the essentials for seasoning.
- All-purpose flour – creates the base for a crisp, golden crust (you can swap cornstarch if needed).
- Garlic powder & onion powder – add layers of flavor to the coating.
- Eggs – help bind the coating.
- Parmesan cheese – freshly grated for that cheesy, crunchy crust.
- Parsley – fresh or dried, adds a nice herby brightness.
- Cooking oil – use a neutral high-smoke-point oil like canola, sunflower, or peanut oil.
- Butter – adds richness and helps with browning.
Step-by-Step Instructions
Follow these detailed steps for the crispiest, juiciest fried chicken breasts:
1. Prep the Chicken
- Place chicken breasts on a cutting board. With your hand flat on top of each breast, carefully slice it in half horizontally to make 2 thinner cutlets per breast.
- Cover cutlets with parchment or plastic wrap, then gently pound with a meat mallet or rolling pin until even in thickness (about ½–¾ inch). This ensures quick, even cooking.
2. Season the Chicken
- Place cutlets in a large mixing bowl. Add minced garlic, salt, and black pepper. Toss well to coat evenly.
- (Optional) Cover and refrigerate for 20–30 minutes to let the flavors absorb, or cook immediately if you’re short on time.
3. Set Up Your Breading Station
- In one shallow dish, whisk together flour, garlic powder, and onion powder.
- In another dish, beat the eggs, then stir in Parmesan cheese, parsley, and a pinch of salt.
- Keep a tray nearby for the dredged chicken.
4. Dredge the Chicken
- Dip one cutlet into the flour mixture, pressing gently so it sticks. Shake off excess.
- Next, dip it into the egg-Parmesan mixture until fully coated.
- Return it to the flour mixture for a second coating—this double dredge gives that irresistible crunchy crust.
- Place on the tray and repeat with remaining chicken, laying cutlets in a single layer.
5. Pan-Fry to Crispy Perfection
- Heat a large skillet (cast iron works best) over medium heat. Add about 4 tablespoons oil + 2 tablespoons butter.
- Once the oil is hot and shimmering, carefully place 2–3 cutlets in the skillet. Do not overcrowd.
- Cook without moving for 4–5 minutes per side, until golden brown and crisp. The internal temperature should reach 165°F.
- Transfer cooked chicken to a wire rack set over a baking sheet (this keeps the crust from going soggy).
- Repeat with remaining cutlets, adding more oil and butter as needed.
6. Serve and Enjoy
- While still hot, sprinkle extra Parmesan or fresh herbs if desired.
- Serve on its own, with dipping sauces, or alongside mashed potatoes, pasta, or a fresh salad.
Tips for Success
- Don’t rush the frying—medium heat ensures a crispy crust without burning.
- Use a wire rack instead of paper towels to keep the crust crunchy.
- Double-dredging = maximum crunch!
- Fresh Parmesan makes a huge difference—avoid the pre-grated stuff if you can.
Serving Ideas
- Slice and layer into a crispy chicken sandwich with lettuce, tomato, and mayo.
- Serve over creamy fettuccine Alfredo or spaghetti marinara.
- Pair with mashed potatoes and gravy for a classic comfort meal.
- Keep it light with a fresh garden salad and lemon vinaigrette.
This crispy fried chicken breast recipe is comfort food at its best—simple, golden, juicy, and made with love. Once you try it, you’ll never go back to dry, boring chicken breasts again!

Best Fried Chicken Breast
Ingredients
Method
- Get the Chicken Ready
- Slice each chicken breast horizontally to make 2 cutlets (total: 8 pieces).
- Place cutlets between parchment or plastic wrap and gently pound with a mallet or rolling pin until even thickness.
- Transfer to a bowl and season with garlic, ¾ tsp salt, and ½ tsp black pepper. Mix well.
- Prepare Dredging Station
- In one shallow bowl, mix flour, garlic powder, and onion powder.
- In another bowl, whisk eggs, Parmesan, parsley, and ½ tsp salt.
- Dredge the Chicken
- Dust a tray with flour to hold coated chicken.
- Working one cutlet at a time:
- Coat in the flour mixture (press in lightly). Shake off excess.
- Dip into the egg mixture until fully coated.
- Return to the flour mixture, pressing well. Clumps of egg + flour add extra crunch.
- Place dredged chicken on the floured tray in a single layer.
- Fry the Chicken
- Set up a wire rack over a baking sheet (to drain after frying).
- In a large skillet, heat 4 tbsp oil + 2 tbsp butter over medium heat until hot (about 1 minute).
- Cook cutlets in batches (don’t overcrowd).
- Fry 5 minutes per side until golden brown and crisp.
- Check doneness: internal temp should be 165°F.
- Remove to the wire rack in a single layer.
- For the second batch, add 4 tbsp oil + 2 tbsp butter again; cook ~4 minutes per side (pan will already be hot).
- Optionally sprinkle hot chicken with Parmesan and parsley.